published July 18, 2022
Use simple utilities to install Windows 11 on any PC.

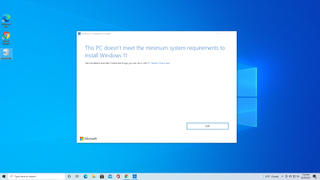
(Image credit: Tom’s Hardware)
Microsoft has some strict hardware requirements that your PC must meet to install Windows 11, including TPM 2.0 support. This means that not only older computers, but virtual machines will refuse to upgrade from Windows 10, giving you a message that “this PC doesn’t currently meet Windows 11 system requirements.”
Fortunately, there are several simple ways you can get bypass Windows 11’s TPM, RAM and other requirements. If you’re doing a clean install with a Windows 11 ISO, you can edit the registry in the middle of the setup process and tell it to skip requirement checks. We’ll show you how to modify the registry in the first section below.
If you don’t want to have to modify the registry mid-install, you can create a Windows 11 USB install disk that will bypass Windows 11’s TPM requirement, and its need for 8GB of RAM and a supported CPU. Using a free tool called Rufus and at least a 16GB Flash drive, you can either perform an in-place upgrade of Windows 10 to 11 or a Windows 11 clean install while getting around these minimums. In the second section of our tutorial below, we’ll show you how to use Rufus to create a requirement-free Windows 11 install disc.
If You Spend Time on Your Computer, this Retro Game is a Must-HaveForge of Empires – Free Online Game
If you have Windows 10 or an earlier build of Windows 11 installed on a PC that didn’t meet the requirements (perhaps a VM), you try to update to a new build with Windows Update and you get the “doesn’t meet requirements” error message, there’s a workaround for that. As we’ll detail in the third section below, a script from AveYo’s Media Creation tool github page will allow you to bypass Windows 11’s TPM requirement even with Windows Update.
RECOMMENDED VIDEOS FOR YOU…CLOSE
https://imasdk.googleapis.com/js/core/bridge3.549.0_en.html#goog_256081846
0 of 2 minutes, 31 secondsVolume 0%
PLAY SOUND
Note that Microsoft also has also created an official registry hack to bypass TPM 2.0 and CPU requirements for an in-place upgrade. However, this method still requires at least TPM 1.2 so, if you have no TPM at all, it’s worthless. We’ll talk about this at the bottom, in case you want to try it.
Also note that, by default, Microsoft’s OS wants you to set it up with a Microsoft account. However, we have another tutorial on how to install Windows 11 without a Microsoft Account by using a few tricks.
How to Bypass Windows 11’s TPM Requirement Using Registry Hacks
If you just have a regular Windows 11 install disk or ISO, you can bypass the Windows TPM and RAM requirements by making some registry changes during the install. Note that this method only works on a clean install and does not allow you to bypass the requirement for at least a dual-core CPU.
1. Boot off of your Windows 11 install disk. If you don’t have one, see our story on how to download Windows 11. The first screen should ask you to choose the language of your install (which will probably be correct).


2. Hit SHIFT + F10 to launch the command prompt.

3. Type regedit and hit Enter to launch registry editor.

4. Navigate to HKEY_LOCAL_MACHINE\SYSTEM\Setup.

5. Create a new registry key under Setup and name it LabConfig. To create a registry key, right click in the right window pane and select New->Key. Then enter the key name.

6. WIthin LabConfig, create DWORDs values called BypassTPMCheck and BypassSecureBoot and set each to 1. To create a new DWORD value, right click in the right window and select new DWORD (32-bit) Value then name the key, double click to open it and set it to 1.

If you also want to bypass the RAM requirement, add a DWORD values for BypassRAMCheck.
7. Close regedit and the command prompt.
You should be able to continue with your Windows 11 installation as normal.
How to Bypass Windows 11’s TPM Requirement Using Rufus
With Rufus, a free utility, you can create a Windows 11 install disk on a USB Flash drive with settings that disable the TPM, RAM and CPU requirements. You can either boot off of this USB Flash drive to do a clean Windows 11 install or run the setup file off of the drive from within Windows 10 to do an in-place upgrade.
For most people, this method is ideal, but there are a couple of disadvantages. First, it requires a 16GB or larger USB Flash drive. Second, because it’s on a Flash drive, it’s more difficult to use for installing Windows 11 on a virtual machine where an ISO file would be ideal.
1. Download the latest version of Rufus and install it on your machine. At the time of writing the latest version is 3.19 which includes the Extended Windows 11 Image support.
2. Insert a blank 16GB or larger USB stick then open Rufus.
3. Select the USB device that you want to install Windows 11 to.

4. Ensure that Boot Selection shows “Disk or ISO image” and click DOWNLOAD.

5. Select Windows 11 and click Continue.

6. Select the latest release and click Continue.

7. Select the edition and click Continue.

8. Select your preferred language and click Continue.

9. Select the architecture (most likely x64) and click Download. A new window will open asking where to save the ISO image. Save it to your Downloads folder. You can also download the image using a browser if you wish.

The download will take several minutes to complete.

10. Click on the Image option drop down and select Extended Windows 11 Installation to disable TPM, Secure Boot and the 8GB of RAM requirement.

11. Double check that the correct drive has been selected and click on Start to begin the installation.

The write process can take some time, depending on the USB drive being used, but when done the drive can be removed and used to install Windows 11 on an older computer or even in a virtual machine.
12. Install or upgrade to Windows 11. Run setup on the USB drive, if you ware doing an in-place install from an existing Windows 10 installation. Boot off of the drive if you are doing a clean install. Note that you may need to disable secure boot in your BIOS (see how to enter your BIOS) if it gives you a problem.
How to Bypass Windows 11 TPM Check From Windows Update
If you want to use Windows Update rather than creating an install disk, you’ll need a method that runs in Windows and fools the updater into thinking you meet the requirements. This may be more important if you are trying to use Windows Update to upgrade to a new build of Windows 11, perhaps an Insider Build, on a computer that already bypassed the requirement.
For example, when we joined the Windows Insider program on one of our Windows 11 VMs (which clearly did not have TPM), we got the dreaded “Your PC doesn’t meet the requirements” error. But using AveYo’s Media Creation Tool workaround script solved the problem. Here’s how to make it happen.
1. Navigate to the Skip_TPM_Check_on_Dynamic_Update.cmd source code on AveYo’s Media Creation Tool Github.
2. Click the “Copy raw contents” button in the upper right corner of the code box.

3. Create a new file on your desktop and name it skip_tpm_check.cmd. Make sure that you are able to view file extensions and the file extension is really .cmd, not .txt or else it won’t run.

4. Open skip_tpm.cmd for editing, using notepad or another text editor.
5. Paste in the code you copied from github.

6. Save and run the skip_tpm.cmd file.
7. Click Yes if prompted by User Account Control.

You will now see a message saying “Skip TPM on Dynamic Update” has been installed. If you run the program again, it will disable the utility.

Windows Update should now be able to either update your existing Windows 11 Build or even perhaps upgrade you from Windows 10 to 11.
How to Bypass Windows 11 TPM the Official Microsoft Way
Knowing that some users will want to install Windows 11 on systems that don’t meet all of its hardware requirements, Microsoft has provided a registry hack that loosens them up somewhat. Using this hack, you can install on a system that has at least TPM 1.2 and has an unsupported CPU. That said, we recommend the scripts above because they don’t require you to have TPM of any kind.
1. Open Regedit.

2. Navigate to HKEY_LOCAL_MACHINE\SYSTEM\Setup\MoSetup.

3. Create a DWORD (32-bit) Value called AllowUpgradesWithUnsupportedTPMOrCPU if it doesn’t already exist.
4. Set AllowUpgradesWithUnsupportedTPMOrCPU to 1.

5. Close regedit and restart your PC. You should now be able to upgrade to Windows 11 from within Windows 10 by using installation media (provided you created it).
More Windows 11 Tutorials:

ใส่ความเห็น